RZ1 Quick Installation Guide
Please review the installation, safety, and maintenance guidelines prior to installation.
The RZ1 system is designed to work seamlessly with almost any vehicle, as it requires minimal compatibility criteria. Follow these step-by-step instructions to properly install the RZ1 Vehicle Hub and Camera.
Box Content Overview:
Main Package:
- RZ1 Vehicle Hub: The central unit responsible for collecting vehicle telematics data and managing connectivity between the system and the cloud.
- RZ1 Camera: A dual-lens dashcam offering both road-facing and cabin-facing views, ensuring comprehensive video monitoring for fleet management.
- Safety Screwdriver: A specialized tool provided for securing and adjusting the system during installation.
Installation Kit:
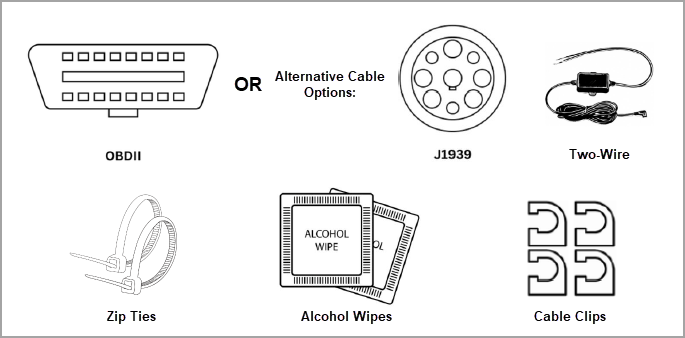
- Power Cable: Connects the RZ1 Vehicle Hub to the vehicle's diagnostic (OBDII) port, supplying power and enabling telematics data collection.
- There are optional cables for connection such as J-1939 or Hardwire
- Hardwire will not support any OBD Codes or Diagnosis Features
- Zip Ties: Helps organize and secure cables, ensuring a neat and safe installation.
- Alcohol Wipe: Cleans the windshield surface to ensure optimal adhesion of the dashcam's 3M mounting pads.
- Cable Clips: Keeps cables firmly in place, preventing interference with the vehicle's operation or driver safety.
Vehicle Hub Installation:
Option 1: OBD/JBUS
- Locate the Vehicle's Diagnostic Port
- Identify the OBDII port (for light-duty vehicles) or the J1939 port (for heavy-duty vehicles). These ports are typically located beneath the dashboard near the steering column.
- Connect the RZ1 Vehicle Hub
- Attach the provided power cable to the OBDII or J1939 port and securely connect it to the PWR/OBD port on the RZ1 Vehicle Hub.
- Position the Hub
- Place the RZ1 Vehicle Hub underneath the dashboard, ensuring it is securely mounted and does not obstruct vehicle operations. For best results, mount it near the outside of the vehicle, to the left of the steering wheel (in most cases), under the dash. Installing it where it is hidden from sight often leads to issues with cell and GPS signals, as well as troubleshooting when required.
- Make sure box is mounted under driver seat or under the dashboard with the lights visible. Secure the box so that there is no movement.
- Cable Management
- Route the cables neatly to prevent interference with pedals, vehicle controls, or the driver. Use the included zip ties or cable clips (sold separately) for secure cable organization.
- Verify Secure Hardware
- Ensure power cable connected to and from the device is firmly and fully inserted.
- Verify Connectivity
- Confirm the vehicle is powered on.
- Initial activation may take up to 5 minutes. If the device enters sleep mode during this time, gently move it to wake it up.
- Wait until all three green LEDs are solid before continuing.
- Any lights means the unit is getting power.
- First Light is Mobile Network – Confirms a stable cellular connection.
- Second Light is GPS Signal – Checks for proper satellite signal reception.
- Third Light is Cloud Connection – Ensures communication to cloud.
Option 2: Two-Wire
- Open the vehicle fuse box and connect
- Red Wire - Goes to a constant power hot fuse. Do not connect to a hot ignition fuse, the dash cam will not work properly.
- Black Wire - This is the ground. Find a reliable metal iron location to attach the ground wire.
- Connect the RZ1 Vehicle Hub
- Attach the provided power cable to the OBDII or J1939 port and securely connect it to the PWR/OBD port on the RZ1 Vehicle Hub.
- Position the Hub
- Place the RZ1 Vehicle Hub underneath the dashboard, ensuring it is securely mounted and does not obstruct vehicle operations. For best results, mount it near the outside of the vehicle, to the left of the steering wheel (in most cases), under the dash. Installing it where it is hidden from sight often leads to issues with cell and GPS signals, as well as troubleshooting when required.
- Make sure box is mounted under driver seat or under the dashboard with the lights visible. Secure the box so that there is no movement.
- Cable Management
- Route the cables neatly to prevent interference with pedals, vehicle controls, or the driver. Use the included zip ties or cable clips (sold separately) for secure cable organization.
- Verify Secure Hardware
- Ensure power cable connected to and from the device is firmly and fully inserted.
- Verify Connectivity
- Confirm the vehicle is powered on.
- Initial activation may take up to 5 minutes. If the device enters sleep mode during this time, gently move it to wake it up.
- Wait until all three green LEDs are solid before continuing.
- Any lights means the unit is getting power.
- First Light is Mobile Network – Confirms a stable cellular connection.
- Second Light is GPS Signal – Checks for proper satellite signal reception.
- Third Light is Cloud Connection – Ensures communication to cloud.

Note:
Regardless of installation type, please ensure that all cables and components are positioned securely and do not obstruct the driver's space or interfere with vehicle operation.
Regardless of installation type, please ensure that all cables and components are positioned securely and do not obstruct the driver's space or interfere with vehicle operation.
Dashcam Mounting Instructions:
- Select the Mounting Location
- Position the camera on the windshield below the rearview mirror and above the windshield sweep area. Ensure the camera has a clear view of the road ahead and the vehicle cabin.
- Prepare the Surface
- Clean the windshield thoroughly using the provided alcohol wipe to ensure proper adhesion of the 3M mounting pad.
- Secure the Camera
- Peel off the protective backing from the 3M mounting pad and press the camera firmly against the windshield. Hold it in place for a few seconds to ensure a strong bond.
- Adjust the Camera Angle
- Use install app to make the adjustments.
- Road-Facing Camera
- Align the horizon line between the red guide lines displayed on the screen.
- Take a snapshot and review the image.
- If misaligned, physically adjust the camera position, then retake the snapshot.
- Repeat until the horizon line is correctly positioned.
- In-Cabin Camera
- Make sure the driver’s face is positioned in the upper 50% of the image. Align their face above the red guideline shown on the screen for proper framing.
- Take a snapshot and review the positioning.
- If needed, physically adjust the camera, then retake the snapshot.
- Repeat until the driver's face is correctly positioned.
- Route the Camera Cable
- Run the cable from the camera along the top edge of the windshield. Use the included cable clips or tuck the cable under the glass seal to secure it neatly.
- Connect to the RZ1 Vehicle Hub
- Attach the camera cable to the CAM port on the RZ1 Vehicle Hub.
- Verify Operation
- Ensure camera cable connected to the device is firmly and fully inserted.
- Check the status LED on the camera in on to ensure it is powered on and operational.
Note:
To connect auxiliary cameras, please review the article here.

Warning:
If at any point after an in-vehicle device is installed a warning lights up on the vehicle dash or the vehicle stalls or has a marked drop in performance, shut off the engine, remove the device, and contact your reseller. Continuing to operate a vehicle with these symptoms can cause loss of vehicle control and serious injury.
If you're having trouble, please review the troubleshooting guide.
Related Articles
MiTAC K220 Installation Guide
This article will show you everything you need to install the K220, and how to do so. Package Contents: At a Glance: Installation Steps: Find the right spot to install the camera. Do not block your view of the road or the rear view mirror. Use the ...RZ1 Installation Troubleshooting
During the installation process, the system performs four main verification tests to ensure proper device functionality: Power Connection, Mobile Network Connection, GPS Connection, and Cloud Connectivity. If any of these tests fail, it may prevent ...Installation, Safety, and Maintenance Guidelines
Professional Installation Recommended For optimal performance and compliance with regulations, it is strongly advised to have the device professionally installed. Mounting Location Install the device in a location that does not obstruct the driver's ...Surfsight Quick Installation Guide
This article will show you everything you need to install the AI-12, and how to do so. Warning This type of installation should be performed by a qualified individual or professional only. Package Contents: AI-12 Camera Mounting Bracket USB Cable ...KP2 Quick Start Guide
KB2 Quick Start Guide Click here to download