Rebooting and Re-Pairing an Auxiliary Camera to Your Dash Cam (WiFi)
Once you've connected the auxiliary camera to a power source, pair it with the vehicle's dashcam. Pairing the auxiliary camera to the dashcam enables the dashcam to pull recordings from the auxiliary camera and upload them to the cloud. Up to four auxiliary cameras can be paired to one dashcam.

Tip
If you are installing multiple dashcams, it's easiest to turn on and pair each auxiliary camera one at a time.
To access the reboot button:
1. Loosen the two screws at the bottom of the camera. This will allow you to swivel the camera and find the lens.

2. Move the lens ball around until you find the reboot button.

3. Hold the reboot button down for 30 seconds.

Attention
After the reboot process has finished, you will need to pair the auxiliary camera to your dash cam again. Please repeat the steps found below.
Re - Pair of the Auxiliary Camera:
Important Prerequisites:
- Make sure the auxiliary camera is connected to power.
- Use any device that connects to WiFi, such as a phone or tablet, to check that the camera can find the available WiFi networks (it appears as AuxCamera_XXXXXX).
1. When you are in the parked vehicle with the parking brake on, the ignition on and the door closed, press the touchscreen of the dashcam to view the PIN screen.
2. Enter the default PIN 3333 to unlock the dashcam for the first time, or your own PIN subsequently.

Note
See 'Set and manage your dashcam PIN' if you need help with your PIN.
The screen unlocks and the menu appears:
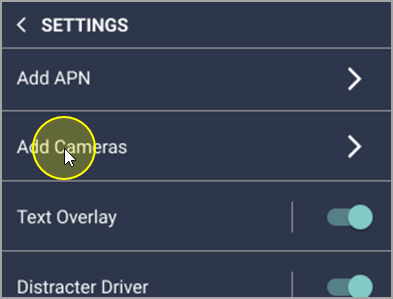
3. Tap Settings.
7. Scroll down and tap Add Cameras.
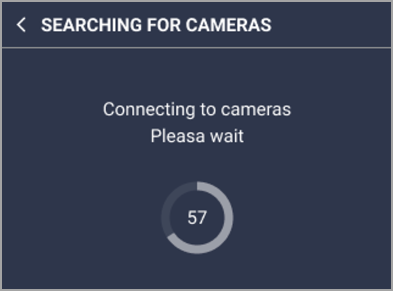
The dashcam searches for available, unpaired cameras. This can take up to a minute.
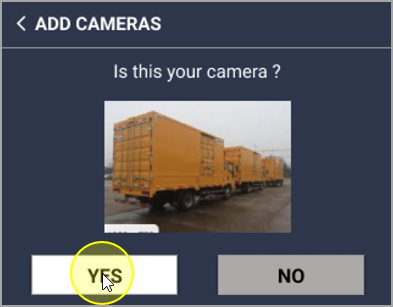
8. A snapshot from the auxiliary camera appears on the screen. If it is the auxiliary camera you want to pair with the dashcam, press YES.
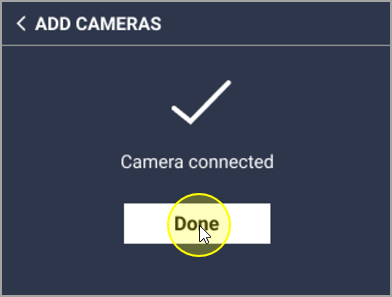
The camera is paired to the dashcam. This can take up to a minute.
9. Press DONE.
You are taken back to the Settings screen.
10. To confirm that the auxiliary camera paired successfully, scroll down and press More Info.
From this screen, you can see all the auxiliary cameras that are connected to your dashcam.
Related Articles
RZ41 - Auxiliary Camera Extension Cable and Adapter Guide
This article explains how to select the correct extension cables and adapter (converter) cables when installing auxiliary cameras on fleet vehicles using the RZ41 Vision Hub. The type of camera and the type of extension cable you choose determine ...FAQ: Surfsight Dash Cam
Q. How can I change the date and time on my dash cam? A. The date and time are determined by the mobile network of the dash cam. You cannot manually change the date or time. You can however change the format of the time in the Settings menu of the ...Understanding the Dash Cam
The dash cam has lenses on each side, allowing it to capture video of the driver and the road at the same time. The in-cab lens has two lenses with two separate sensors, one is RGB, designed for the day, and the other is IR (infrared), which allows ...How to Access the 'Settings' Tab in Your Dash Cam (And What's In It)
This process shows how you can access your settings tab and every setting you can change, with an in-depth explanation. Accessing the 'Settings' Tab: When you are in park with the parking brake on, the ignition on, and the door closed, press the ...Why Does My Dash Cam Not Power On?
In this guide, we will go through different troubleshooting methods for figuring out why your dash cam won't turn on. Alert If this is a brand new dash cam or if it has been in storage for a while, it might need to charge for up to 1 hour before it ...