How to Hardwire the AI-12 Dash Cam to the Vehicle Fuse Box
To utilize all the features of the AI-12 dash cam, including Standby mode, it must be connected to a constant power source. The dash cam should only be connected by using the provided power cables. If the installation is canceled and the dash cam has power, power it off to avoid draining the battery.

Warning
This installation must be performed by a qualified or professional person. Working with your vehicle's power system can be dangerous. Consult a professional for guidance.

Note
While in Standby mode, you are able to retrieve recordings from the dash cam.
Get Organized:
To hardwire the dash cam to the fuse box, use the following equipment:
Note
The hardware kit includes two wires and a dash cam connector:
- A black ground wire for a metal ground bolt
- A red wire to connect the dash cam to power
- A cable with a barrel connector to connect to the dash cam
(The wires require a 12V or 24V power source)
Locate Your Fuse Box
Check the owner's manual of the vehicle to find the fuse box, which may be located in different locations depending on the vehicle model. Once located, remove the panel to gain access to the fuse box. Open it by lifting a tab and pulling it towards you or with a trim tool.
Check the owner's manual of the vehicle to find the fuse box, which may be located in different locations depending on the vehicle model. Once located, remove the panel to gain access to the fuse box. Open it by lifting a tab and pulling it towards you or with a trim tool.
Which Slot Should I Use?
Use a circuit tester to test which fuse is constant. A constant fuse stays on when the car is off.
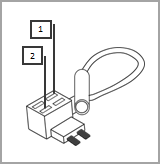
Add-A-Fuse Kit
Use the Add-A-Fuse kit included in the hardware installation kit for a more secure installation. This kit provides a fuse slot for the existing circuit (#2 in the picture below) and another fuse slot for the new circuit for the dash cam (#1 in the picture below).
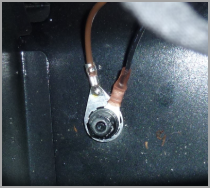
The Ground Wire
This wire is usually in the shape of a ring or a C.
Hardwire the Dash Cam:
- Insert the new fuse that was provided in the installation kit into Slot 1 of the Add-A-Fuse kit.
- Insert the fuse from the vehicle fuse box into Slot 2.Note
If you insert them in the wrong order, the power will not go through. -
Trim off some of the rubber tubing to expose the wiring on your hardwired cable.
-
Using needle-nose pliers, crimp the red wire (constant power) cable with the terminal crimp connector that was included in your kit.
-
Connect your kit to the vehicle fuse slot you chose.
- Connect the ground wire (black) by putting it under a metal bolt or screwing it into your vehicle.Note
A loose ground wire can cause power issues for your dash cam. - Connect the power cable to the dash cam.
 Important
Once you have hardwired the dash cam to a power source, it will start up automatically every time the vehicle moves. - Start your vehicle to test out the dash cam.Note
If the dash cam was in storage, the battery might be drained. Before using it, you need to charge it for an extended period of time (up to an hour). -
Once you have finished testing your dash cam, run the power cable along the headliner from the A-Pillar to the power source.
Related Articles
What is in the RZ1 Dash Cam Box?
Before we begin, make sure you have received all these items in your box: Main Package: The primary package includes the core components necessary to get your RZ1 system operational: RZ1 Vehicle Hub: The central unit responsible for collecting ...How to Wake Up the AI-12 Dash Cam
Standby mode preserves the battery life of the dash cam, and also tells fleet managers when the vehicle is moving, and when it isn't. This ability is helpful for tracking and protecting the vehicle and any property that may be inside it. The dash cam ...How to Navigate the AI-12 Dash Cam Screen
This guide will go through the different menus of the dash cam and what each icon means. To Turn On the Dash Cam Screen and Access the Menu: After you have parked the vehicle with the parking brake on, the ignition on, and the door closed, press the ...How to Connect the AI-12 Dash Cam to a Power Source
To utilize all the features of the AI-12 dash cam, including Standby mode, it must be connected to a constant power source. The dash cam should only be connected by using the provided power cables. If the installation is canceled and the dash cam has ...How to Set the AI-12 Dash Cam Viewing Angles
You can set the viewing angles of both the road-facing and in-cab lenses. To Set the View Angles: When you are in park with the parking brake on, the ignition on, and the doors closed, press the touchscreen to view the PIN screen. Enter the default ...